Mittwoch, 17. Januar 2024

Leveraging OCI Document Understanding AI for Document Processing

Leveraging AI for Document Processing with the Document AI Scanner

Oracle's new Document Understanding AI provides a powerful way to extract insights from scanned documents using artificial intelligence. Built on Oracle APEX and integrating with the Oracle Cloud Infrastructure Document Understanding AI service, this open source tool that I developed streamlines the intake and analysis of document collections.

I was first introduced to Document AI's capabilities and REST API through Jon Dixon's insightful blog Quickly Turn Text into Data with APEX & Document AI

In his blog, Jon provides a comprehensive overview of Document AI and demonstrates how to call the AnalyzeDocument endpoint directly from an APEX application. 

What it Does


The Document AI Scanner allows users to upload multiple PDF or image files for processing as a batch. It then passes the documents to the Document Understanding AI service which performs text extraction, table and field detection, document classification and more.

Once analysis is complete, users can view detailed results within the app or download them as a ZIP file. Key-value pairs and other extracted data can also be exported directly to an accounting database for further processing.

Key Capabilities

  • Full text extraction and searchability of uploaded documents
  • Identification of tables and structured fields
  • Classification of document types like invoices or forms
  • Language detection to support proper NLS settings
  • Long running jobs that don't time out
  • Downloadable analysis files for record keeping

Behind the Scenes

The app leverages algorithms to process the raw AI output. Using techniques like relative positioning and data type validation, it forms key-value pairs from text fragments.

My client needed to process German bills, but the text recognition was limited to the ASCII character set. This meant German umlauts and "sz" were missing from extracted text, and date/number formats were misinterpreted. To address this, I developed my own text interpreter by hand-crafting rules to handle these language-specific cases and produce better key-value pairs from the documents.

  • The absence of German characters in the OCR output made it hard to match names and addresses within the address table. A special index had to be built to support matching despite missing characters like umlauts and ß.
  • Dates, numbers and currencies are formatted differently in German compared to English. It took work to parse these values accurately based on local conventions.
  • German abbreviations and acronyms that may be used in bills needed to be researched and accounted for in the interpreter rules.
  • Idiomatic phrases, terminology and jargon specific to billing/invoicing in German posed challenges to understand and interpret correctly.
  • Ambiguous or incomplete text fragments from OCR output limited the amount of context available to accurately interpret meanings. Additional heuristics may have been needed.
  • Ensuring the interpreter worked robustly across a variety different bill/invoice styles, templates and edge cases from various issuing companies.
  • Debugging and testing the complex set of hand-crafted rules required considerable effort to refine the interpreter to a useful level of accuracy.
  • Integrating the custom interpreter with the existing application architecture and output formats required careful programming.
It was a challenge to develop the customized interpreter within the limited capabilities of the general Document AI service. My hope is that Oracle continues expanding the service to support more languages out of the box. Alternatively, the ability to train custom models is valuable, but requires significant labeled data - which I did not have for this exact task. Overall the app demonstrates how artificial intelligence can be leveraged through a combination of commercial and custom solutions.

The Document AI Scanner application showcases how technical challenges with language and interpretation can be overcome through a combination of commercial and custom solutions. While developing the bespoke text interpreter involved effort, it allowed valuable insights to be extracted from an otherwise limited data set.

For those interested in exploring the application further or contributing enhancements, the source code is available on GitHub at:

https://github.com/dstrack/Document-AI-Scanner

Please check out the repo for full implementation details, installation instructions, and how to get involved with ongoing development. I hope this project helps advance capabilities for automated document processing globally.


Dienstag, 11. Januar 2022

Automatically publish translations after changes in an APEX app

Seed & Publish Translations Plug-In

There is a little annoyance that you encounter when you develop multilingual APEX apps. When your primary language is English and the current session language is different for example German, then changes in your applications will not be displayed in that session, because APEX continues to display an older version that you have published earlier. Even when the change is invisible program logic it will be ignored.

A required task for APEX developers is: When any modification is made to your primary application, perform the "Seed" and "Publish" operations to recreate an updated version of your translated application(s). I had to repeat this task dozens of times by tweaking the layout for a second language.

You have to seed and publish the translations to see the change in your translated session. Since APEX provides API functions for the seeding and publishing of translations and metadata about the last publishing date can be retrieved from a view, this can be automated with an APEX processing Plug-In. While implementing the plug-in I copied a solution for the Data Browser App that can publish the translated apps in a background process. When you run the API calls as described in the APEX API Reference book by setting the environment with apex_util.set_security_group_id you can run the apex_lang.seed_translations and apex_lang.publish_application inside a procedure that is called in a scheduler job. When the procedure is defined with AUTHID DEFINER, then the scheduler jobs are enabled to find the translations. But when you execute this in an anonymous code block, then the call to apex_util.set_security_group_id has to be replaced by a call to apex_session.attach to enable the apex_lang API calls.

This Plug-In keeps the translated applications up-to-date automatically by seeding and publishing the running application with an asynchronous background job.

The Plug-In solves the following problems:

  1. When you develop multilingual APEX applications, you have to repeat the "Seed" and "Publish" operations as often as you make any changes. For example: When your application's primary language is English and you inspect the german version of your app you may find issues with truncated labels because of the space for much longer item labels. When you change the "Column Span" of an item you have to repeat the publish translations operation to see the result of your change in the german app.
  2. When you install multilingual APEX applications on a different website via the import application process, you have to manually perform the publish operation to see the translated version of your app.
  3. You have to wait many seconds until the "Seed" and "Publish" operations are completed before you can continue with your work.

The Plug-In process performs the following steps:

  • Retrieve the last updated date of the application.
  • Retrieve the value of a preference variable PUBLISH_TRANSLATIONSXX where XX is the application id.
  • Compares the last updated date with the preference variable and quit when the values are equal.
  • Store the last updated date in the preference variable.
  • Create a small script to seed & publish the app in all supported languages.
  • Execute the script immediately or asynchronous.
See the GitHub repository for more details:

A simple Demo App is provided in the repository and runs at:


Samstag, 3. Juli 2021

APEX API Tracer

Generate APEX_DEBUG Calls to Trace Parameter Values for whole packages

APEX API Tracer enables the tracing of calls to package procedures or functions into the APEX Debug Log without manual programming.

This program can generate a package for tracing automatically when the following conditions apply:

  1.   the package is accessible to the schema user via a synonym.
  2.   the procedure or function is listed in the package header.
  3.   the package header is not wrapped.

The enable - procedure will generate a package with the same name as the synonym in your local schema.

The link from your local applications to the synonym will be intercepted by the generated package.

The package will contain the same functions and procedures as the original package.

When the Option 'Logging of Procedure Start' is set to Yes, then each function and procedure consists of:  

  1. A call to APEX_DEBUG.LOG_LONG_MESSAGE to produce log entries with text for valid PL/SQL procedure calls with enquoted parameters, that you can copy and paste into the sql console for testing. Arguments of type IN and IN/OUT are logged.
  2. A call to invocate the original procedure or functions.
  3. A call to APEX_DEBUG.LOG_LONG_MESSAGE to produce log entries for the output values and return values of the invocation. Arguments of type OUT and IN/OUT are logged.

When the Option 'Logging of Procedure Start' is set to No, then each function and procedure consists of:  

  1. A call to invocate the original procedure or functions. 
  2. A call to APEX_DEBUG.LOG_LONG_MESSAGE to produce log entries for all argument values and function return values of the invocation. Arguments of type IN, OUT, and IN/OUT are logged.

For other packages where the above-mentioned conditions do not apply, you can manually add generated code with invocations to the api_trace package to support logging for prepared functions or procedures in your own packages. 

Usage

Install the APEX application with supporting objects.

Start the Application and use the Switch in the column 'Tracing is Enabled' to start and stop the tracing of a package. The app will list for some packages the grant statements that you have to execute as an admin. 


Example output for the package APEX_LANG:

 create or replace NONEDITIONABLE PACKAGE       "APEX_LANG"  
 is  
 -- This package was generated by package_tracer from Strack Software Development, Berlin, Germany.  
 -- It replaces : PUBLIC SYNONYM "APEX_LANG" for "APEX_190100"."HTMLDB_LANG"  
 function message (  
   p_name           in varchar2 default null,  
   p0             in varchar2 default null,  
   p1             in varchar2 default null,  
   p2             in varchar2 default null,  
   p3             in varchar2 default null,  
   p4             in varchar2 default null,  
   p5             in varchar2 default null,  
   p6             in varchar2 default null,  
   p7             in varchar2 default null,  
   p8             in varchar2 default null,  
   p9             in varchar2 default null,  
   p_lang           in varchar2 default null,  
   p_application_id      in number default null)  
   return varchar2  
   ;  
 procedure message_p (  
   p_name           in varchar2 default null,  
   p0             in varchar2 default null,  
   p1             in varchar2 default null,  
   p2             in varchar2 default null,  
   p3             in varchar2 default null,  
   p4             in varchar2 default null,  
   p5             in varchar2 default null,  
   p6             in varchar2 default null,  
   p7             in varchar2 default null,  
   p8             in varchar2 default null,  
   p9             in varchar2 default null,  
   p_lang           in varchar2 default null,  
   p_application_id      in number  default null)  
   ;  
 function lang (  
   p_primary_text_string    in varchar2 default null,  
   p0             in varchar2 default null,  
   p1             in varchar2 default null,  
   p2             in varchar2 default null,  
   p3             in varchar2 default null,  
   p4             in varchar2 default null,  
   p5             in varchar2 default null,  
   p6             in varchar2 default null,  
   p7             in varchar2 default null,  
   p8             in varchar2 default null,  
   p9             in varchar2 default null,  
   p_primary_language     in varchar2 default null)  
   return varchar2  
   ;  
 procedure create_message(  
   p_application_id in number,  
   p_name      in varchar2,  
   p_language    in varchar2,  
   p_message_text  in varchar2 )  
   ;  
 procedure update_message(  
   p_id      in number,  
   p_message_text in varchar2 );  
 procedure delete_message(  
   p_id in number );  
 procedure update_translated_string(  
   p_id    in number,  
   p_language in varchar2,  
   p_string  in varchar2);  
 procedure seed_translations(  
   p_application_id in number,  
   p_language    in varchar2 );  
 procedure create_language_mapping(  
   p_application_id       in number,  
   p_language          in varchar2,  
   p_translation_application_id in number);  
 procedure update_language_mapping(  
   p_application_id       in number,  
   p_language          in varchar2,  
   p_new_trans_application_id  in number);  
 procedure delete_language_mapping(  
   p_application_id in number,  
   p_language    in varchar2);  
 procedure publish_application(  
   p_application_id      in number,  
   p_language         in varchar2,  
   p_new_trans_application_id in number default null );  
 procedure emit_language_selector_list;  
 end APEX_LANG;  
 /  
   
 create or replace NONEDITIONABLE PACKAGE BODY       "APEX_LANG"  
 IS   
 function message (  
   p_name           in varchar2 default null,  
   p0             in varchar2 default null,  
   p1             in varchar2 default null,  
   p2             in varchar2 default null,  
   p3             in varchar2 default null,  
   p4             in varchar2 default null,  
   p5             in varchar2 default null,  
   p6             in varchar2 default null,  
   p7             in varchar2 default null,  
   p8             in varchar2 default null,  
   p9             in varchar2 default null,  
   p_lang           in varchar2 default null,  
   p_application_id      in number default null)  
   return varchar2  
     
 is  
   lv_result VARCHAR2(32767);  
 begin  
   lv_result := apex_190100.htmldb_lang.message(p_name,p0,p1,p2,p3,p4,p5,p6,p7,p8,p9,p_lang,p_application_id);  
     apex_debug.log_long_message(p_message=>'API: ' || 'apex_lang.message('  
    || 'p_Name=>' || api_trace.Literal(p_Name)  
    || ', p0=>' || api_trace.Literal(p0)  
    || ', p1=>' || api_trace.Literal(p1)  
    || ', p2=>' || api_trace.Literal(p2)  
    || ', p3=>' || api_trace.Literal(p3)  
    || ', p4=>' || api_trace.Literal(p4)  
    || ', p5=>' || api_trace.Literal(p5) || chr(10)  
    || ', p6=>' || api_trace.Literal(p6)  
    || ', p7=>' || api_trace.Literal(p7)  
    || ', p8=>' || api_trace.Literal(p8)  
    || ', p9=>' || api_trace.Literal(p9)  
    || ', p_Lang=>' || api_trace.Literal(p_Lang)  
    || ', p_Application_Id=>' || api_trace.Literal(p_Application_Id) || ')' || ' returns '  
    || api_trace.Literal(lv_result), p_level=>5);  
   return lv_result;  
 end message;  
   
 procedure message_p (  
   p_name           in varchar2 default null,  
   p0             in varchar2 default null,  
   p1             in varchar2 default null,  
   p2             in varchar2 default null,  
   p3             in varchar2 default null,  
   p4             in varchar2 default null,  
   p5             in varchar2 default null,  
   p6             in varchar2 default null,  
   p7             in varchar2 default null,  
   p8             in varchar2 default null,  
   p9             in varchar2 default null,  
   p_lang           in varchar2 default null,  
   p_application_id      in number  default null)  
     
 is  
 begin  
   apex_190100.htmldb_lang.message_p(p_name,p0,p1,p2,p3,p4,p5,p6,p7,p8,p9,p_lang,p_application_id);  
     apex_debug.log_long_message(p_message=>'API: ' || 'apex_lang.message_p('  
    || 'p_Name=>' || api_trace.Literal(p_Name)  
    || ', p0=>' || api_trace.Literal(p0)  
    || ', p1=>' || api_trace.Literal(p1)  
    || ', p2=>' || api_trace.Literal(p2)  
    || ', p3=>' || api_trace.Literal(p3)  
    || ', p4=>' || api_trace.Literal(p4)  
    || ', p5=>' || api_trace.Literal(p5) || chr(10)  
    || ', p6=>' || api_trace.Literal(p6)  
    || ', p7=>' || api_trace.Literal(p7)  
    || ', p8=>' || api_trace.Literal(p8)  
    || ', p9=>' || api_trace.Literal(p9)  
    || ', p_Lang=>' || api_trace.Literal(p_Lang)  
    || ', p_Application_Id=>' || api_trace.Literal(p_Application_Id) || ')', p_level=>5);  
 end message_p;  
   
 function lang (  
   p_primary_text_string    in varchar2 default null,  
   p0             in varchar2 default null,  
   p1             in varchar2 default null,  
   p2             in varchar2 default null,  
   p3             in varchar2 default null,  
   p4             in varchar2 default null,  
   p5             in varchar2 default null,  
   p6             in varchar2 default null,  
   p7             in varchar2 default null,  
   p8             in varchar2 default null,  
   p9             in varchar2 default null,  
   p_primary_language     in varchar2 default null)  
   return varchar2  
     
 is  
   lv_result VARCHAR2(32767);  
 begin  
   lv_result := apex_190100.htmldb_lang.lang(p_primary_text_string,p0,p1,p2,p3,p4,p5,p6,p7,p8,p9,p_primary_language);  
     apex_debug.log_long_message(p_message=>'API: ' || 'apex_lang.lang('  
    || 'p_Primary_Text_String=>' || api_trace.Literal(p_Primary_Text_String)  
    || ', p0=>' || api_trace.Literal(p0)  
    || ', p1=>' || api_trace.Literal(p1)  
    || ', p2=>' || api_trace.Literal(p2)  
    || ', p3=>' || api_trace.Literal(p3)  
    || ', p4=>' || api_trace.Literal(p4)  
    || ', p5=>' || api_trace.Literal(p5) || chr(10)  
    || ', p6=>' || api_trace.Literal(p6)  
    || ', p7=>' || api_trace.Literal(p7)  
    || ', p8=>' || api_trace.Literal(p8)  
    || ', p9=>' || api_trace.Literal(p9)  
    || ', p_Primary_Language=>' || api_trace.Literal(p_Primary_Language) || ')' || ' returns '  
    || api_trace.Literal(lv_result), p_level=>5);  
   return lv_result;  
 end lang;  
   
 procedure create_message(  
   p_application_id in number,  
   p_name      in varchar2,  
   p_language    in varchar2,  
   p_message_text  in varchar2 )  
     
 is  
 begin  
   apex_190100.htmldb_lang.create_message(p_application_id,p_name,p_language,p_message_text);  
     apex_debug.log_long_message(p_message=>'API: ' || 'apex_lang.create_message('  
    || 'p_Application_Id=>' || api_trace.Literal(p_Application_Id)  
    || ', p_Name=>' || api_trace.Literal(p_Name)  
    || ', p_Language=>' || api_trace.Literal(p_Language)  
    || ', p_Message_Text=>' || api_trace.Literal(p_Message_Text) || ')', p_level=>5);  
 end create_message;  
   
 procedure update_message(  
   p_id      in number,  
   p_message_text in varchar2 )  
 is  
 begin  
   apex_190100.htmldb_lang.update_message(p_id,p_message_text);  
     apex_debug.log_long_message(p_message=>'API: ' || 'apex_lang.update_message('  
    || 'p_Id=>' || api_trace.Literal(p_Id)  
    || ', p_Message_Text=>' || api_trace.Literal(p_Message_Text) || ')', p_level=>5);  
 end update_message;  
   
 procedure delete_message(  
   p_id in number )  
 is  
 begin  
   apex_190100.htmldb_lang.delete_message(p_id);  
     apex_debug.log_long_message(p_message=>'API: ' || 'apex_lang.delete_message('  
    || 'p_Id=>' || api_trace.Literal(p_Id) || ')', p_level=>5);  
 end delete_message;  
   
 procedure update_translated_string(  
   p_id    in number,  
   p_language in varchar2,  
   p_string  in varchar2)  
 is  
 begin  
   apex_190100.htmldb_lang.update_translated_string(p_id,p_language,p_string);  
     apex_debug.log_long_message(p_message=>'API: ' || 'apex_lang.update_translated_string('  
    || 'p_Id=>' || api_trace.Literal(p_Id)  
    || ', p_Language=>' || api_trace.Literal(p_Language)  
    || ', p_String=>' || api_trace.Literal(p_String) || ')', p_level=>5);  
 end update_translated_string;  
   
 procedure seed_translations(  
   p_application_id in number,  
   p_language    in varchar2 )  
 is  
 begin  
   apex_190100.htmldb_lang.seed_translations(p_application_id,p_language);  
     apex_debug.log_long_message(p_message=>'API: ' || 'apex_lang.seed_translations('  
    || 'p_Application_Id=>' || api_trace.Literal(p_Application_Id)  
    || ', p_Language=>' || api_trace.Literal(p_Language) || ')', p_level=>5);  
 end seed_translations;  
   
 procedure create_language_mapping(  
   p_application_id       in number,  
   p_language          in varchar2,  
   p_translation_application_id in number)  
 is  
 begin  
   apex_190100.htmldb_lang.create_language_mapping(p_application_id,p_language,p_translation_application_id);  
     apex_debug.log_long_message(p_message=>'API: ' || 'apex_lang.create_language_mapping('  
    || 'p_Application_Id=>' || api_trace.Literal(p_Application_Id)  
    || ', p_Language=>' || api_trace.Literal(p_Language)  
    || ', p_Translation_Application_Id=>' || api_trace.Literal(p_Translation_Application_Id) || ')', p_level=>5);  
 end create_language_mapping;  
   
 procedure update_language_mapping(  
   p_application_id       in number,  
   p_language          in varchar2,  
   p_new_trans_application_id  in number)  
 is  
 begin  
   apex_190100.htmldb_lang.update_language_mapping(p_application_id,p_language,p_new_trans_application_id);  
     apex_debug.log_long_message(p_message=>'API: ' || 'apex_lang.update_language_mapping('  
    || 'p_Application_Id=>' || api_trace.Literal(p_Application_Id)  
    || ', p_Language=>' || api_trace.Literal(p_Language)  
    || ', p_New_Trans_Application_Id=>' || api_trace.Literal(p_New_Trans_Application_Id) || ')', p_level=>5);  
 end update_language_mapping;  
   
 procedure delete_language_mapping(  
   p_application_id in number,  
   p_language    in varchar2)  
 is  
 begin  
   apex_190100.htmldb_lang.delete_language_mapping(p_application_id,p_language);  
     apex_debug.log_long_message(p_message=>'API: ' || 'apex_lang.delete_language_mapping('  
    || 'p_Application_Id=>' || api_trace.Literal(p_Application_Id)  
    || ', p_Language=>' || api_trace.Literal(p_Language) || ')', p_level=>5);  
 end delete_language_mapping;  
   
 procedure publish_application(  
   p_application_id      in number,  
   p_language         in varchar2,  
   p_new_trans_application_id in number default null )  
 is  
 begin  
   apex_190100.htmldb_lang.publish_application(p_application_id,p_language,p_new_trans_application_id);  
     apex_debug.log_long_message(p_message=>'API: ' || 'apex_lang.publish_application('  
    || 'p_Application_Id=>' || api_trace.Literal(p_Application_Id)  
    || ', p_Language=>' || api_trace.Literal(p_Language)  
    || ', p_New_Trans_Application_Id=>' || api_trace.Literal(p_New_Trans_Application_Id) || ')', p_level=>5);  
 end publish_application;  
   
 procedure emit_language_selector_list  
 is  
 begin  
   apex_190100.htmldb_lang.emit_language_selector_list;  
     apex_debug.log_long_message(p_message=>'API: ' || 'apex_lang.emit_language_selector_list', p_level=>5);  
 end emit_language_selector_list;  
   
 END APEX_LANG;  
 /  


For some APEX APIs you have to grant access to the following objects:

GRANT EXECUTE ON APEX_<version>.WWV_FLOW_SECURITY TO <schema_name>;

GRANT EXECUTE ON APEX_<version>.WWV_FLOW_THEMES TO <schema_name>;

GRANT EXECUTE ON APEX_<version>.WWV_FLOW_THEME_STYLES TO <schema_name>;

Start an APEX application that you want to trace and execute a page with debugging LEVEL5 enabled. The debug log will now contain entries that list the invocations with input and output parameters for the prepared packages. 

Example APEX Debug Log with API Calls:


Trace Code for LOCAL packages

Here you can list invocations to the package api_trace for your own local packages.  

The switches 'Compact' and 'Logging of Procedure Start' control the code generation for your need.

Copy the listed code into your package to enable tracing of your procedures and functions.

The generated code uses the api_trace. Literal function to convert the passed values to quoted literals.

The function api_trace.Literal is overloaded to support many data types. Datatypes that can not be converted like records are logged with a <datatype x> placeholder. The logged values are truncated to a maximum length.

The compact form of the generated code is executed directly with the simple passing of the function arguments list. 

The number of arguments will be checked at runtime to match the count of arguments of the current calling function.

Publish Application Objects in other Schema

Here you can produce a mirror copy of a schema.
The target schema name should be a new empty schema, that was created in the APEX Admin / Workspace to Schema Assignment page.
In the copy tables and views are present as views that access the original tables and views.
Other objects like packages, functions, procedures, and types are represented as synonyms.
An application that can run in the original schema will be able to run in the copied schema too.

The application can be downloaded in the following Github repository:

https://github.com/dstrack/APEX_API_Tracer

A demo of the app can be found here:

https://yboieokpjit8ejk-strackdev02.adb.eu-frankfurt-1.oraclecloudapps.com/ords/f?p=104:9999

Name: demo Password: Simple/8021


Samstag, 19. Juni 2021

An APEX Plugin for download of Interactive Reports as ZIP files

 APEX processing plugin for downloading large APEX Interactive Reports as ZIP files.

In case you have to download very large reports from an APEX Instance that is running behind a web proxy server or in cases where you have to download reports with more rows than the technical limit allows you to use, you can use this plugin to successfully download these reports. File size up to 2 GB is supported for the compressed data. The Sample App can be installed in APEX 5 or higher.

Usage:

1. Install the plugin file process_type_plugin_com_strack-software_ir_zip_download.sql in your application.

2. add a Button to your Report region.

3. set the Button action to redirect and set the link to the current page with Request = 'ZIP_DOWNLOAD'


4. In the Rendering tab at pre-Rendering / Before Header you add a 'Process' of type 'plugin', choose the 'IR Zip Download' plugin.

    Set the Setting / Region Name to contain the title of the IR Region.

    Set Condition / Type to : REQUEST = Value, set Condition / Value to : ZIP_DOWNLOAD


The plugin performs the following steps:

1. extract the query with APEX_IR.GET_REPORT

2. bind the variables

3. Open cursor for the query

4. convert to CSV.

5. Convert to zip with APEX_ZIP.ADD_FIle

6. Start the download to the browser


The plugin can be downloaded from Github:

A demo app is available here:

Sonntag, 30. Mai 2021

A printer friendly template for the APEX Universal Theme

Oracle APEX enables you to optimize a page for printing: Optimizing a Page for Printing

In the Theme 25. Blue Responsive there exists a template PRINTER_FRIENDLY for printing an APEX page as HTML with the users' web browser in a printer-friendly modus. In the universal Theme 42. Universal Theme this template is missing. An attempt to print for example a large classic report page with Firefox via the Browsers Print Menu printed only the first page followed by empty pages. The responsive design CSS rules seem to cause this problem.

The printer_friendly output of multi-page reports in the APEX Universal Theme can be reactivated with a custom page template, a menu entry, and by printing with a jQuery plugin. These are the steps to implement the printer-friendly modus in an application with a universal theme. 

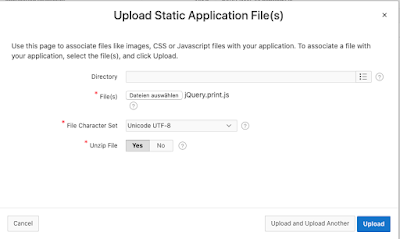
1. Install jQuery.print.js as an Application file

Download the file jQuery.print and then upload this file into your Shared Components / Static Application Files


After uploading the following file should be listed.


2. prepare the page template

Go to shared components Templates and filter the list with Theme = 42, Type = page. Then Copy the template named 'Minimal (No Navigation)' by clicking on the copy Icon of that row. Name the new template 'Printer Friendly'. Click Copy the save it.


3. Edit the new page template

Set the Template Class: Printer Friendly

In the entry for body paste the following HTML code. Above the #BODY# substitution tag, two buttons Back and Print have been inserted.
 <div class="t-Body">  
  <div class="t-Body-main">  
    <div class="t-Body-title" id="t_Body_title">  
     #REGION_POSITION_01#  
    </div>  
    <div class="t-Body-content" id="t_Body_content">  
     <div class="t-Body-contentInner" role="main">  
     <button class="t-Button t-Button--noLabel t-Button--icon" onclick="history.back();" type="button" id="GO_BACK" title="Go Back" aria-label="Go Back">  
      <span class="t-Icon fa fa-arrow-left" aria-hidden="true">  
      </span>  
     </button>  
     <button class="t-Button t-Button--noLabel t-Button--icon" onclick="$.print(print_region);" type="button" id="PRINT_REPORT" title="Print Report" aria-label="Print Report">  
      <span class="t-Icon fa fa-print" aria-hidden="true">  
      </span>  
     </button>  
      #BODY#  
     </div>  
     <footer class="t-Footer" role="contentinfo">  
      <div class="t-Footer-body">  
       <div class="t-Footer-content">#REGION_POSITION_05#</div>  
      </div>  
     </footer>  
    </div>  
  </div>  
 </div>  
 <div class="t-Body-inlineDialogs">  
  #REGION_POSITION_04#  
 </div>  
At runtime, the buttons Back and Print will be displayed at the top of the page.


In the section 'Javascript' set
- Files URLs: 
#APP_IMAGES#jQuery.print.js

- Functions and Global Variable Declaration:
var print_region = 'div.t-Body-contentInner';

- Execute when Page Loads:
apex.theme42.initializePage.noSideCol();
$(document).ready(function() {
    window.setTimeout(function() {
        $.print(print_region);
    }, 100);
});


In the section 'Cascading Style Sheet' set 
- inline:
@media print {
  button#PRINT_REPORT,button#GO_BACK {
   display: none;
  }
 }

4. Edit the Theme Component defaults

In Shared Components click on Themes. In the Themes list click on the Name 'Universal Theme - 42'. Now set the Printer Friendly Page to  'Printer Friendly' and Save.


5. Prepare the menu entry

In Shared Components click on Navigation Bar List. In the Lists Report click on the Name 'Navigation Bar'. Now click on 'Create Entry'. Set the following items:

Image/Class: fa-print

List Entry Label: Print

Target type: Page in this Application

Page : &APP_PAGE_ID.

reset pagination for this page: enabled

Printer Friendly: enabled

Condition Type: User is Authenticated (not public) – to avoid display on the login page


After saving the Menu Entry the following line should be shown in the List Details:


When you run your application you will see a Print Icon in the upper-right of your web page. 

When you click this button the printer-friendly page will be loaded. The page will open the browser's printer dialog popup window. Here you can further optimize the output and redirect the output to a pdf file.

You can specify a print region for each page by overwriting the javascript variable print_region. For example, set the Static ID of a page region to TABLE_DATA_HEAD and then add the following line the the 'Function and Global Variable declaration': 

var print_region = $('div#TABLE_DATA_VIEW');


The template and its functionality is demonstrated in the Schema & Data Browser APEX application that has been released on 

Freitag, 11. Dezember 2020

Schema & Data Browser - Part 4

A new Beta Release Version 1.9.10 of the Schema & Data Browser APEX application has been released on https://github.com/dstrack/Schema_Data_Browser


Many of the concepts of the data browser that were described in the previous blogpost are now implemented and can be demonstrated.

Data Browser Improvements:

  • Improved query generation for import/export views and for history, counters, links, totals, and folder path LOVs.
  • Better joins descriptions for Import / Export forms in the Actions / Columns modal dialog.
  • Improved navigation in the Actions / Show Query modal dialog. The view mode can be chosen in a tab-pane.
  • Improved trigger generation for updatable views. Added a key lookup for composite keys with a file path.
  • Faster installation and refresh of materialized views.
  • Improved page load performance for home page and data browser.
  • Improved progress bar display for scheduler jobs.
  • Improved query generation for LOVs. Up to 4 levels of recursion are now resolved to build hierarchical and path descriptions.
  • Manage Schema Tasks: The processes to add primary and natural keys have been improved. New buttons enable you to generate and download updatable views and UI-defaults.
  • Improved refresh of report regions.
  • Improved Dialog for Sorting and Grouping
  • Early validation of entered data against the schema constraints and size limits via AJAX calls is now enabled.
  • On the home page, the list of My Databases is now displayed when the application is using APEX authentication. This list informed you about the accessible schemas and their space usage and it enables you to switch the active schema by clicking on an entry. Multiple schemas have to be assigned to the APEX workspace and the supporting objects of the application have to be installed in those schemas to make them accessible for this application.

Sources:

  • The PL/SQL packages weco_mail, weco_auth_mgr, and table app_preferences have been removed.
  • The Pre-Installation-Validations for the privileges to execute dbms_lock, dbms_tcp, and dbms_smtp have been removed.
  • In the custom authorization scheme, the package apex_mail is used instead of weco_mail.
  • All of the PL/SQL and javascript source files that are installed by the application are listed in the repository sources directory of the git repository.
  • Removed references to apex_ajax and instead use apex.server.process and plugin apex-plugin-clob-load.
  • the demo time period is now 2 months.

Setting up a new Schema
This application enables you and other users with an APEX developer account in your workspace to add new schemas at runtime. I believe that it is a got practice to create at least one new schema name for each independent application. When you have watched the video from the fabulous Mr. Connor McDonald 'From Doors Wide Open ... to By Invitation Only!' you may come to the same conclusion.
Besides the advantages of modularization and separation of concerns, you can get rid of prefixes for your table names and can use namespaces instead. For example, the table name oehr_Employees becomes oehr.Employees.
The following video demonstrates how to add a new (database) schema named 'HR Data'. the user has to enter a password for the database user, that can be used in SQL-Developer and a second password for the current user for the schema admin account (that is stored as a hash value in the table app_users in that schema.


The video demonstrated the Installation of a sample dataset and setting of the table prefixes to improve the displayed names. When that is done we click on the entry 'Hr Data' in the 'My Databases' list to activate the database as current. A background job will be started that refreshes the table and columns system statistics and builds a fast access cache from the data dictionary system views in a set of materialized views. 


The next video is about Manage Schema Task: Define recursive natural keys to produce detailed record descriptions and define mandatory key columns to improve the key lookup in the triggers of updateable views. Then see an example updatable view Voehr_Employees_Imp with a trigger to handle the DML operations. 


 CREATE OR REPLACE VIEW VOEHR_EMPLOYEES_IMP  
   ( LINK_ID$, FIRST_NAME, LAST_NAME, EMAIL, PHONE_NUMBER, HIRE_DATE, JOB_JOB_ID, SALARY, COMMISSION_PCT, MANAGER_EMAIL, DEPARTMENT_DEPARTMENT_NAME, DEPARTMENT_LOC_STREET_ADDRESS, DEPARTMENT_LOCATI_POSTAL_CODE, DEPARTMENT_LOCATION_CITY, DEPARTMENT_LOC_STATE_PROVINCE, DEPARTMENT_LOCAT_COUNTRY_NAME, DEPARTMENT_LOCATI_REGION_NAME  
   , CONSTRAINT VOEHR_EMPLOYEES_IMP_PK PRIMARY KEY (LINK_ID$) RELY DISABLE )   
  AS   
 SELECT    
   A.EMPLOYEE_ID LINK_ID$,  
   A.FIRST_NAME,  
   A.LAST_NAME,  
   A.EMAIL,  
   A.PHONE_NUMBER,  
   A.HIRE_DATE,  
   B.JOB_ID JOB_JOB_ID,  
   A.SALARY,  
   A.COMMISSION_PCT,  
   C.EMAIL MANAGER_EMAIL,  
   D.DEPARTMENT_NAME DEPARTMENT_DEPARTMENT_NAME,  
   D_C.STREET_ADDRESS DEPARTMENT_LOC_STREET_ADDRESS,  
   D_C.POSTAL_CODE DEPARTMENT_LOCATI_POSTAL_CODE,  
   D_C.CITY DEPARTMENT_LOCATION_CITY,  
   D_C.STATE_PROVINCE DEPARTMENT_LOC_STATE_PROVINCE,  
   D_C_B.COUNTRY_NAME DEPARTMENT_LOCAT_COUNTRY_NAME,  
   D_C_B_B.REGION_NAME DEPARTMENT_LOCATI_REGION_NAME  
 FROM OEHR_EMPLOYEES A  
 JOIN OEHR_JOBS B ON B.JOB_ID = A.JOB_ID  
 LEFT OUTER JOIN OEHR_EMPLOYEES C ON C.EMPLOYEE_ID = A.MANAGER_ID  
 LEFT OUTER JOIN OEHR_DEPARTMENTS D ON D.DEPARTMENT_ID = A.DEPARTMENT_ID  
 LEFT OUTER JOIN OEHR_LOCATIONS D_C ON D_C.LOCATION_ID = D.LOCATION_ID  
 LEFT OUTER JOIN OEHR_COUNTRIES D_C_B ON D_C_B.COUNTRY_ID = D_C.COUNTRY_ID  
 LEFT OUTER JOIN OEHR_REGIONS D_C_B_B ON D_C_B_B.REGION_ID = D_C_B.REGION_ID;  
   
 CREATE OR REPLACE TRIGGER VOEHR_EMPLOYEES_IMP_TR INSTEAD OF INSERT OR UPDATE OR DELETE ON VOEHR_EMPLOYEES_IMP FOR EACH ROW   
 DECLARE   
   v_row OEHR_EMPLOYEES%ROWTYPE;  
   v_DEPARTMENT_LOCATION_ID OEHR_LOCATIONS.LOCATION_ID%TYPE;  
   v_DEPARTMENT_LOCATION_REGION_ID OEHR_REGIONS.REGION_ID%TYPE;  
   v_DEPARTMENT_LOCATIO_COUNTRY_ID OEHR_COUNTRIES.COUNTRY_ID%TYPE;  
 BEGIN  
   if DELETING then   
     DELETE FROM OEHR_EMPLOYEES A   
     WHERE A.EMPLOYEE_ID = :new.LINK_ID$;  
     return;  
   end if;  
   v_row.EMPLOYEE_ID           := :new.LINK_ID$;  
   v_row.FIRST_NAME            := :new.FIRST_NAME;  
   v_row.LAST_NAME            := :new.LAST_NAME;  
   v_row.EMAIL              := :new.EMAIL;  
   v_row.PHONE_NUMBER           := :new.PHONE_NUMBER;  
   v_row.HIRE_DATE            := :new.HIRE_DATE;  
   v_row.SALARY              := :new.SALARY;  
   v_row.COMMISSION_PCT          := :new.COMMISSION_PCT;  
   if :new.DEPARTMENT_LOCATI_REGION_NAME IS NOT NULL then   
    begin  
     SELECT D_C_B_B.REGION_ID INTO v_DEPARTMENT_LOCATION_REGION_ID  
     FROM OEHR_REGIONS D_C_B_B   
     WHERE D_C_B_B.REGION_NAME = :new.DEPARTMENT_LOCATI_REGION_NAME;  
    exception when NO_DATA_FOUND then  
     INSERT INTO OEHR_REGIONS(REGION_NAME)  
     VALUES (:new.DEPARTMENT_LOCATI_REGION_NAME)  
     RETURNING (REGION_ID) INTO v_DEPARTMENT_LOCATION_REGION_ID;  
    end;  
   end if;  
   if :new.MANAGER_EMAIL IS NOT NULL then   
     SELECT C.EMPLOYEE_ID INTO v_row.MANAGER_ID  
     FROM OEHR_EMPLOYEES C   
     WHERE C.EMAIL = :new.MANAGER_EMAIL;  
   end if;  
   if :new.JOB_JOB_ID IS NOT NULL then   
     SELECT B.JOB_ID INTO v_row.JOB_ID  
     FROM OEHR_JOBS B   
     WHERE B.JOB_ID = :new.JOB_JOB_ID;  
   end if;  
   if :new.DEPARTMENT_LOCAT_COUNTRY_NAME IS NOT NULL  
   or v_DEPARTMENT_LOCATION_REGION_ID IS NOT NULL then   
     SELECT D_C_B.COUNTRY_ID INTO v_DEPARTMENT_LOCATIO_COUNTRY_ID  
     FROM OEHR_COUNTRIES D_C_B   
     WHERE (D_C_B.COUNTRY_NAME = :new.DEPARTMENT_LOCAT_COUNTRY_NAME OR D_C_B.COUNTRY_NAME IS NULL AND :new.DEPARTMENT_LOCAT_COUNTRY_NAME IS NULL)  
     AND (D_C_B.REGION_ID = v_DEPARTMENT_LOCATION_REGION_ID OR D_C_B.REGION_ID IS NULL AND v_DEPARTMENT_LOCATION_REGION_ID IS NULL);  
   end if;  
   if :new.DEPARTMENT_LOC_STREET_ADDRESS IS NOT NULL  
   or :new.DEPARTMENT_LOCATI_POSTAL_CODE IS NOT NULL  
   or :new.DEPARTMENT_LOCATION_CITY IS NOT NULL  
   or :new.DEPARTMENT_LOC_STATE_PROVINCE IS NOT NULL  
   or v_DEPARTMENT_LOCATIO_COUNTRY_ID IS NOT NULL then   
    begin  
     SELECT D_C.LOCATION_ID INTO v_DEPARTMENT_LOCATION_ID  
     FROM OEHR_LOCATIONS D_C   
     WHERE (D_C.STREET_ADDRESS = :new.DEPARTMENT_LOC_STREET_ADDRESS OR D_C.STREET_ADDRESS IS NULL AND :new.DEPARTMENT_LOC_STREET_ADDRESS IS NULL)  
     AND (D_C.POSTAL_CODE = :new.DEPARTMENT_LOCATI_POSTAL_CODE OR D_C.POSTAL_CODE IS NULL AND :new.DEPARTMENT_LOCATI_POSTAL_CODE IS NULL)  
     AND (D_C.CITY = :new.DEPARTMENT_LOCATION_CITY OR :new.DEPARTMENT_LOCATION_CITY IS NULL)  
     AND (D_C.STATE_PROVINCE = :new.DEPARTMENT_LOC_STATE_PROVINCE OR D_C.STATE_PROVINCE IS NULL AND :new.DEPARTMENT_LOC_STATE_PROVINCE IS NULL)  
     AND (D_C.COUNTRY_ID = v_DEPARTMENT_LOCATIO_COUNTRY_ID OR D_C.COUNTRY_ID IS NULL AND v_DEPARTMENT_LOCATIO_COUNTRY_ID IS NULL);  
    exception when NO_DATA_FOUND then  
     INSERT INTO OEHR_LOCATIONS(STREET_ADDRESS, POSTAL_CODE, CITY, STATE_PROVINCE, COUNTRY_ID)  
     VALUES (:new.DEPARTMENT_LOC_STREET_ADDRESS, :new.DEPARTMENT_LOCATI_POSTAL_CODE, :new.DEPARTMENT_LOCATION_CITY, :new.DEPARTMENT_LOC_STATE_PROVINCE, v_DEPARTMENT_LOCATIO_COUNTRY_ID)  
     RETURNING (LOCATION_ID) INTO v_DEPARTMENT_LOCATION_ID;  
    end;  
   end if;  
   if :new.DEPARTMENT_DEPARTMENT_NAME IS NOT NULL  
   or v_DEPARTMENT_LOCATION_ID IS NOT NULL then   
    begin  
     SELECT D.DEPARTMENT_ID INTO v_row.DEPARTMENT_ID  
     FROM OEHR_DEPARTMENTS D   
     WHERE (D.DEPARTMENT_NAME = :new.DEPARTMENT_DEPARTMENT_NAME OR :new.DEPARTMENT_DEPARTMENT_NAME IS NULL)  
     AND (D.LOCATION_ID = v_DEPARTMENT_LOCATION_ID OR D.LOCATION_ID IS NULL AND v_DEPARTMENT_LOCATION_ID IS NULL);  
    exception when NO_DATA_FOUND then  
     INSERT INTO OEHR_DEPARTMENTS(DEPARTMENT_NAME, LOCATION_ID)  
     VALUES (:new.DEPARTMENT_DEPARTMENT_NAME, v_DEPARTMENT_LOCATION_ID)  
     RETURNING (DEPARTMENT_ID) INTO v_row.DEPARTMENT_ID;  
    end;  
   end if;  
   
   if INSERTING then   
     INSERT INTO OEHR_EMPLOYEES VALUES v_row;  
   else   
     UPDATE OEHR_EMPLOYEES SET   
       FIRST_NAME = v_row.FIRST_NAME,  
       LAST_NAME = v_row.LAST_NAME,  
       EMAIL = v_row.EMAIL,  
       PHONE_NUMBER = v_row.PHONE_NUMBER,  
       HIRE_DATE = v_row.HIRE_DATE,  
       JOB_ID = v_row.JOB_ID,  
       SALARY = v_row.SALARY,  
       COMMISSION_PCT = v_row.COMMISSION_PCT,  
       MANAGER_ID = v_row.MANAGER_ID,  
       DEPARTMENT_ID = v_row.DEPARTMENT_ID  
     WHERE EMPLOYEE_ID = :new.LINK_ID$;  
   end if;  
 END VOEHR_EMPLOYEES_IMP_TR;  
 /

When the columns of the natural keys are defined as mandatory (NOT NULL), then the lookup operations require fewer OR conditions to handle NULL cases.
   

CREATE OR REPLACE VIEW VOEHR_EMPLOYEES_IMP  
   ( LINK_ID$, FIRST_NAME, LAST_NAME, EMAIL, PHONE_NUMBER, HIRE_DATE, JOB_JOB_ID, SALARY, COMMISSION_PCT, MANAGER_EMAIL, DEPARTMENT_DEPARTMENT_NAME, DEPARTMENT_LOC_STREET_ADDRESS, DEPARTMENT_LOCATI_POSTAL_CODE, DEPARTMENT_LOCATION_CITY, DEPARTMENT_LOC_STATE_PROVINCE, DEPARTMENT_LOCAT_COUNTRY_NAME, DEPARTMENT_LOCATI_REGION_NAME  
   , CONSTRAINT VOEHR_EMPLOYEES_IMP_PK PRIMARY KEY (LINK_ID$) RELY DISABLE )   
  AS   
 SELECT    
   A.EMPLOYEE_ID LINK_ID$,  
   A.FIRST_NAME,  
   A.LAST_NAME,  
   A.EMAIL,  
   A.PHONE_NUMBER,  
   A.HIRE_DATE,  
   B.JOB_ID JOB_JOB_ID,  
   A.SALARY,  
   A.COMMISSION_PCT,  
   C.EMAIL MANAGER_EMAIL,  
   D.DEPARTMENT_NAME DEPARTMENT_DEPARTMENT_NAME,  
   D_C.STREET_ADDRESS DEPARTMENT_LOC_STREET_ADDRESS,  
   D_C.POSTAL_CODE DEPARTMENT_LOCATI_POSTAL_CODE,  
   D_C.CITY DEPARTMENT_LOCATION_CITY,  
   D_C.STATE_PROVINCE DEPARTMENT_LOC_STATE_PROVINCE,  
   D_C_B.COUNTRY_NAME DEPARTMENT_LOCAT_COUNTRY_NAME,  
   D_C_B_B.REGION_NAME DEPARTMENT_LOCATI_REGION_NAME  
 FROM OEHR_EMPLOYEES A  
 JOIN OEHR_JOBS B ON B.JOB_ID = A.JOB_ID  
 LEFT OUTER JOIN OEHR_EMPLOYEES C ON C.EMPLOYEE_ID = A.MANAGER_ID  
 LEFT OUTER JOIN OEHR_DEPARTMENTS D ON D.DEPARTMENT_ID = A.DEPARTMENT_ID  
 LEFT OUTER JOIN OEHR_LOCATIONS D_C ON D_C.LOCATION_ID = D.LOCATION_ID  
 LEFT OUTER JOIN OEHR_COUNTRIES D_C_B ON D_C_B.COUNTRY_ID = D_C.COUNTRY_ID  
 LEFT OUTER JOIN OEHR_REGIONS D_C_B_B ON D_C_B_B.REGION_ID = D_C_B.REGION_ID;  
   
 CREATE OR REPLACE TRIGGER VOEHR_EMPLOYEES_IMP_TR INSTEAD OF INSERT OR UPDATE OR DELETE ON VOEHR_EMPLOYEES_IMP FOR EACH ROW   
 DECLARE   
   v_row OEHR_EMPLOYEES%ROWTYPE;  
   v_DEPARTMENT_LOCATION_ID OEHR_LOCATIONS.LOCATION_ID%TYPE;  
   v_DEPARTMENT_LOCATION_REGION_ID OEHR_REGIONS.REGION_ID%TYPE;  
   v_DEPARTMENT_LOCATIO_COUNTRY_ID OEHR_COUNTRIES.COUNTRY_ID%TYPE;  
 BEGIN  
   if DELETING then   
     DELETE FROM OEHR_EMPLOYEES A   
     WHERE A.EMPLOYEE_ID = :new.LINK_ID$;  
     return;  
   end if;  
   v_row.EMPLOYEE_ID           := :new.LINK_ID$;  
   v_row.FIRST_NAME            := :new.FIRST_NAME;  
   v_row.LAST_NAME            := :new.LAST_NAME;  
   v_row.EMAIL              := :new.EMAIL;  
   v_row.PHONE_NUMBER           := :new.PHONE_NUMBER;  
   v_row.HIRE_DATE            := :new.HIRE_DATE;  
   v_row.SALARY              := :new.SALARY;  
   v_row.COMMISSION_PCT          := :new.COMMISSION_PCT;  
   if :new.DEPARTMENT_LOCATI_REGION_NAME IS NOT NULL then   
    begin  
     SELECT D_C_B_B.REGION_ID INTO v_DEPARTMENT_LOCATION_REGION_ID  
     FROM OEHR_REGIONS D_C_B_B   
     WHERE D_C_B_B.REGION_NAME = :new.DEPARTMENT_LOCATI_REGION_NAME;  
    exception when NO_DATA_FOUND then  
     INSERT INTO OEHR_REGIONS(REGION_NAME)  
     VALUES (:new.DEPARTMENT_LOCATI_REGION_NAME)  
     RETURNING (REGION_ID) INTO v_DEPARTMENT_LOCATION_REGION_ID;  
    end;  
   end if;  
   if :new.MANAGER_EMAIL IS NOT NULL then   
     SELECT C.EMPLOYEE_ID INTO v_row.MANAGER_ID  
     FROM OEHR_EMPLOYEES C   
     WHERE C.EMAIL = :new.MANAGER_EMAIL;  
   end if;  
   if :new.JOB_JOB_ID IS NOT NULL then   
     SELECT B.JOB_ID INTO v_row.JOB_ID  
     FROM OEHR_JOBS B   
     WHERE B.JOB_ID = :new.JOB_JOB_ID;  
   end if;  
   if :new.DEPARTMENT_LOCAT_COUNTRY_NAME IS NOT NULL  
   and v_DEPARTMENT_LOCATION_REGION_ID IS NOT NULL then   
     SELECT D_C_B.COUNTRY_ID INTO v_DEPARTMENT_LOCATIO_COUNTRY_ID  
     FROM OEHR_COUNTRIES D_C_B   
     WHERE D_C_B.COUNTRY_NAME = :new.DEPARTMENT_LOCAT_COUNTRY_NAME  
     AND D_C_B.REGION_ID = v_DEPARTMENT_LOCATION_REGION_ID;  
   end if;  
   if :new.DEPARTMENT_LOC_STREET_ADDRESS IS NOT NULL  
   or :new.DEPARTMENT_LOCATI_POSTAL_CODE IS NOT NULL  
   or :new.DEPARTMENT_LOCATION_CITY IS NOT NULL  
   or :new.DEPARTMENT_LOC_STATE_PROVINCE IS NOT NULL  
   or v_DEPARTMENT_LOCATIO_COUNTRY_ID IS NOT NULL then   
    begin  
     SELECT D_C.LOCATION_ID INTO v_DEPARTMENT_LOCATION_ID  
     FROM OEHR_LOCATIONS D_C   
     WHERE (D_C.STREET_ADDRESS = :new.DEPARTMENT_LOC_STREET_ADDRESS OR :new.DEPARTMENT_LOC_STREET_ADDRESS IS NULL)  
     AND (D_C.POSTAL_CODE = :new.DEPARTMENT_LOCATI_POSTAL_CODE OR D_C.POSTAL_CODE IS NULL AND :new.DEPARTMENT_LOCATI_POSTAL_CODE IS NULL)  
     AND (D_C.CITY = :new.DEPARTMENT_LOCATION_CITY OR :new.DEPARTMENT_LOCATION_CITY IS NULL)  
     AND (D_C.STATE_PROVINCE = :new.DEPARTMENT_LOC_STATE_PROVINCE OR D_C.STATE_PROVINCE IS NULL AND :new.DEPARTMENT_LOC_STATE_PROVINCE IS NULL)  
     AND (D_C.COUNTRY_ID = v_DEPARTMENT_LOCATIO_COUNTRY_ID OR v_DEPARTMENT_LOCATIO_COUNTRY_ID IS NULL);  
    exception when NO_DATA_FOUND then  
     INSERT INTO OEHR_LOCATIONS(STREET_ADDRESS, POSTAL_CODE, CITY, STATE_PROVINCE, COUNTRY_ID)  
     VALUES (:new.DEPARTMENT_LOC_STREET_ADDRESS, :new.DEPARTMENT_LOCATI_POSTAL_CODE, :new.DEPARTMENT_LOCATION_CITY, :new.DEPARTMENT_LOC_STATE_PROVINCE, v_DEPARTMENT_LOCATIO_COUNTRY_ID)  
     RETURNING (LOCATION_ID) INTO v_DEPARTMENT_LOCATION_ID;  
    end;  
   end if;  
   if :new.DEPARTMENT_DEPARTMENT_NAME IS NOT NULL  
   and v_DEPARTMENT_LOCATION_ID IS NOT NULL then   
    begin  
     SELECT D.DEPARTMENT_ID INTO v_row.DEPARTMENT_ID  
     FROM OEHR_DEPARTMENTS D   
     WHERE D.DEPARTMENT_NAME = :new.DEPARTMENT_DEPARTMENT_NAME  
     AND D.LOCATION_ID = v_DEPARTMENT_LOCATION_ID;  
    exception when NO_DATA_FOUND then  
     INSERT INTO OEHR_DEPARTMENTS(DEPARTMENT_NAME, LOCATION_ID)  
     VALUES (:new.DEPARTMENT_DEPARTMENT_NAME, v_DEPARTMENT_LOCATION_ID)  
     RETURNING (DEPARTMENT_ID) INTO v_row.DEPARTMENT_ID;  
    end;  
   end if;  
   
   if INSERTING then   
     INSERT INTO OEHR_EMPLOYEES VALUES v_row;  
   else   
     UPDATE OEHR_EMPLOYEES SET   
       FIRST_NAME = v_row.FIRST_NAME,  
       LAST_NAME = v_row.LAST_NAME,  
       EMAIL = v_row.EMAIL,  
       PHONE_NUMBER = v_row.PHONE_NUMBER,  
       HIRE_DATE = v_row.HIRE_DATE,  
       JOB_ID = v_row.JOB_ID,  
       SALARY = v_row.SALARY,  
       COMMISSION_PCT = v_row.COMMISSION_PCT,  
       MANAGER_ID = v_row.MANAGER_ID,  
       DEPARTMENT_ID = v_row.DEPARTMENT_ID  
     WHERE EMPLOYEE_ID = :new.LINK_ID$;  
   end if;  
 END VOEHR_EMPLOYEES_IMP_TR;  
 /  

In the case that you want to use this kind of named views in your application, you can press the button 'Generate Updatable Views' to install a set of views with the name V<Table_Name>_IMP as a logical projection layer of your tables. In the next step, you can click the 'Export UI Defaults' button to export detailed properties for the GUI field for new forms on those tables or views. You then have to import the downloaded file hr_data_uidefaults.sql in your workspace. The Demo App EMPS demonstrates how the view Voehr_Employees_Imp can be used in a Facetted Search, edited in an Interactive Grid, Interactive Report, and Data Entry Form. When you use this view in a data loading process, you can not only load data into the table Oehr_Employees, but also load new entries into Oehr_Regions, Oehr_Locations, and Oehr_Departments. Not a single line of SQL code had to be written in this demo app.

Add Calculations: Add a calculated column Netto_Price and define summands to produce totals (Order Items - ... Netto Price, and Employee - ... Salary) in grouped reports of referenced tables.


Add Audit columns to tables with a name that starts with OEHR. The columns Created_At, Created_By,  Last_Modified_At, and Last_Modified_By are added to the tables. The values are managed by default on null function calls in the column definition and with BEFORE UPDATE triggers.

The DDL statements that were performed to alter your schema are stored in the table app_protocol and can be exported with this app.

I hope you find some inspiration and a use case with this app. I welcome contributions and other feedback on github.com like stars and issues. I have got interested in implementing a practical kind of updatable views that were explained by E.F.Codd in the book 'The Relational Model for Database Management Version 2', Page 299, Chapter 17.3 View-updatability Algorithms VU-1 and VU-2. 
When a database application has fast access to the data dictionary constraint definitions, it can provide much more automatic functionality than just expanding a table name to a report or form on the raw data structures.

Regards
Dirk Strack

Sonntag, 27. September 2020

List of values (LOVs) for your APEX app from CHECK (COL IN (...)) constraints

Some time ago a customer asked me to build him an APEX app with a special feature. The CHECK constraints of the application's SQL tables can be altered in the future, and the APEX form pages should require no changes in that case. One of the problems I had to solve was to use dynamic LOV definitions instead of static LOV definitions since they will outdate. For columns with CHECK (COL IN (...) constraints, the view V_LOV_FROM_CHECK_IN_LIST  produces dynamic LOVs with values from the constraint definition. (You must be connected to at least an Oracle Database 18c to use column SEARCH_CONDITION_VC and APEX 5.1 to use the required apex_string.split function.)

 CREATE OR REPLACE VIEW V_LOV_FROM_CHECK_IN_LIST (Table_Name, Column_Name, Display_Value, Column_Value)   
 AS   
  SELECT Table_Name, Column_Name,  
   INITCAP(Column_Value) Display_Value,  
   Column_Value  
 FROM (SELECT Table_Name, Column_Name,   
     REGEXP_REPLACE(TRIM(Column_Value),                      -- remove quotes  
          '^''(.*)''$', '\1'  
     ) Column_Value  
   FROM ( -- convert values to rows  
     SELECT C.Table_Name, B.Column_Name,   
                REGEXP_REPLACE( C.SEARCH_CONDITION_VC,   
                     B.Column_Name || '\s+IN\s*\((.+)\)\s*$',   
                     '\1', 1, 1, 'i'  
       ) CHECK_IN_LIST                                    -- extract values list  
     FROM SYS.USER_CONSTRAINTS C  
     JOIN SYS.USER_CONS_COLUMNS B   
      ON C.Constraint_Name = B.Constraint_Name AND C.Table_Name = B.Table_Name  
     WHERE C.CONSTRAINT_TYPE = 'C'                         -- check constraint  
     AND C.Table_Name NOT LIKE 'BIN$%'                     -- this table is not in the recyclebin  
           AND REGEXP_INSTR( C.SEARCH_CONDITION_VC,           -- find CHECK (COL IN (...)) rules  
                B.Column_Name || '\s+IN\s*\(.+\)\s*$',   
       1, 1, 1, 'i'  
     ) > 0   
   ) S,  
   TABLE( apex_string.split(S.CHECK_IN_LIST, ',')) P     -- extract individual (quoted) values  
 );  
 COMMENT ON TABLE V_LOV_FROM_CHECK_IN_LIST IS 'List of values from simple CHECK (COL IN (...)) constraint for each table column.';  

Using the following example table:

 CREATE TABLE TEST_TABLE (   
      ID NUMBER CONSTRAINT TEST_TABLE_PK PRIMARY KEY,   
      ZOOM_FACTOR FLOAT DEFAULT 1 NOT NULL CONSTRAINT TEST_TABLE_ZOOM_FACTOR_CK CHECK ( ZOOM_FACTOR IN (1, 2, 4, 8) ),  
      EXCLUDE_SINGLES VARCHAR2(5) DEFAULT 'NO' NOT NULL CONSTRAINT TEST_TABLE_EXCL_SINGLE_CK CHECK ( Exclude_Singles IN ('YES','NO') ),  
      EDGE_LABELS VARCHAR2(5) DEFAULT 'YES' NOT NULL      CONSTRAINT TEST_TABLE_EDGE_LABELS_CK CHECK ( Edge_Labels IN ('YES','NO','BOXES') ),  
      EXCITE_METHOD VARCHAR2(50) DEFAULT 'none' NOT NULL CONSTRAINT TEST_TABLE_EXCITE_METHOD_CK   
           CHECK (EXCITE_METHOD IN ('none', 'selected', 'downstream', 'upstream', 'connected'))  
 );  

Now you can replace the static LOV for column EXCITE_METHOD for example with a dynamic LOV that is getting the values from your table definitions. You can do this replacement for all table-columns with CHECK (col IN (...)) constraints that are listed by the view.

 SELECT Display_Value d, Column_Value r  
 FROM V_LOV_FROM_CHECK_IN_LIST
WHERE Table_Name = 'TEST_TABLE' AND Column_Name = 'EXCITE_METHOD';

Old static LOV definition
New dynamic LOV definition

Samstag, 19. September 2020

Close a APEX modal dialog, by clicking on the main window

When your #orclAPEX app shows modal dialog windows, the app user has to click a button or the little X-icon in the upper right corner to close this dialog. Moving the mouse to these buttons takes your user's time.

You can enable the user to close a dialog window, by clicking or tapping on the main window. Put the following javascript code in the 'Execute when Page Loads' section of your APEX page:

$(document).on('click', 'div.ui-widget-overlay.ui-front', function(){

    apex.navigation.dialog.close(true, false);

});


Mittwoch, 26. August 2020

Schema & Data Browser – Part 3

A new release of the Schema & Data Browser app has been published on GitHub.com 

here is are links to the demo with an apex account
https://yboieokpjit8ejk-strackdev02.adb.eu-frankfurt-1.oraclecloudapps.com/ords/f?p=2000:101
https://apex.oracle.com/pls/apex/f?p=48950:101

Schema & Data Browser V 1.8.77 Release Note

New features 
on page Manage Schema
1. Export UI Defaults 
Enables you to download a UI Defaults definition PL/SQL script file for tables of the current schema with additional attributes like optimal width, max length, format masks, and LOVs for references, Yes/No fields, and check constraints with IN-Lists.
You can import this file with APEX to improve the default appearance of new forms on your tables.
Example: https://github.com/dstrack/Schema_Data_Browser/blob/master/Examples/hr_uidefaults.sql

2. Export Updatable Views - download a PL/SQL Script with Create View statements for updatable views.
The data browser displays this kind of view as report variant 'Import View'.
In the Dialog Window 'Show query' you can choose 'Create View' to see the Script for the currently selected table. The setting for 'Import Controls' (Compare Case Insensitive, Search keys unique, Search keys unique) and UNIQUE CONSTRAINTS for the display values of your LOVs will control the generation of these views.
The views will have INSTEAD OF INSERT OR UPDATE OR DELETE triggers that will manage the processing of DML statements on those views.
You can import and execute this file with the APEX "SQL Workshop / Scripts" page to install these views. You may use this view as a data source in Interactive Grid.
There you will be able to search in the display values based on LOV for references, 
and you will be able to edit data in each column.
Example: https://github.com/dstrack/Schema_Data_Browser/blob/master/Examples/hr_imp_views.sql

Bugfix: The generated query SQL code for rendering the form will call APEX_ESCAPE.HTML for character columns to prevent Cross-Site Scripting.
The bug was discovered by Ved Prabhu from Bangalore, India, and then reported by Joel R. Kallman from Oracle.

UI-Appearance Option: Added a global control to show or hide Breadcrumbs below the page title. The control can be set by the online user via the Navigation Bar menu.

Data Browser: The style of the View Mode Navigation List has been changed to Navigation Tabs to improve the highlighting of the current View Mode.
The entries for 'Entity Relationship Diagram' and 'Springy Diagram' have been removed from the View Mode Navigation List and have been added to the 'Actions' menu.

Improved descriptions and help text and improved german translation of the App UI.


Features of the application: Data Browser  

The key functionality of the SQL query and PL/SQL generators
1. Produce a description of any record 
Candidate keys are detected and serve as the unique display column set to describe any table record in LOVs, References, Record Labels, Link Labels.
2. Identify any record
Primary keys are detected and serve as internal identifiers that are hidden from the users. Functions to produce new identities(from sequence or sys_guid), references (columns Link_ID$, Row_Selector$),  and access methods (by column name or ROWID) are automatically applied.(Weak constraint definitions like unique index definition are also detected and considered)

2. Produce formatted descriptions
Any Number and Date field will be formatted with predefined or calculated format masks.

3. Produce recursive description
Any foreign key in the display column set is replaced by the reference target description.
4. Perform reverse key lookups
 This functionality is used to process imported data without any programming.

Any data that is entered or loaded in unique description fields from joined tables can be reduced to new or existing primary key values. This is possible when the tables have primary keys and candidate keys defined and the referenced rows exist or can be inserted because no constraint is violated.
Rows can be inserted when the table definition has default value or functions for all required columns that are not included in the view or that are empty in the import dataset. Required columns must have default values or can be initialized from the context (container references).

5. Produce a description of any relation 
For any foreign key constraint, a description of the reference source and target is composed to produce Report Labels, LOV queries, master-details reports. The relationship of tables is used to produce a navigation tree there tables are shows as childs of parent tables when they have foreign key references to that parent table.

6. Produce a description of any reference 
Any foreign key column can be replaced by a description of the reference target. The replacement can produce multiple formatted columns. Unique columns headers are produced by combining source column names and target table names.

7. Produce composed description 
The columns of a tables display column set can be concatenated with predefined delimiters to produce a composed description. The composed description is used to produce the display values required in 'Select List' und 'Popup List of Values' form items and in for link labels.

8. Produce human-readable and updatable views on any sufficiently defined table.
All available information from the data dictionary is aggregated in snapshot views for fast access. Functional programming is applied to enable spontaneous query and code generation. A query generator is invoked to produce new functions that render reports and forms. Code generators are invoked to produce new functions that perform controlled and correct data manipulations.

9. The system catalog is the single source for table and column names and their attributes.
With name pattern matching, functional properties are applied to matching columns. Any changes in the system catalog are reflected immediately in the rendered reports and forms. Spontaneous changes to the running applications are supported. Projects with an agile workflow and DevOp projects are possible. But projects with more conservative demands are also supported. It is possible to model forms and reports and then extract and copy the generated SQL Queries and PL/SQL Code. You can use it as UI Defaults, in static Apex pages, in the Data Reporter App, and PL/SQL libraries. The report queries can be extracted as updatable views that can be utilized in Apex Interactive Grids.

Forms 
Dynamically produced tabular and single record forms in Readonly or Edit Mode for any table. 
Changes in the schema definition are reflected immediately in the rendered forms.
Produce Field labels
Detect and removes common column prefixes and postfixes.
Compose unique field names for columns of joined tables.
Column Infos 
Help Text with column comments, format mask, description of constraints, functional meaning, statistics: Min, Max, Count, Density.
Developers have options to alter the comments and constraints (range of permitted values).
Produce a diverse variety of input fields 
Including formatted numbers, date, date-time, timestamp, text, multiline textbox, office documents, images, boolean (Yes/No switch), 
Popup links and modal dialogs for 'Rich Text Editor', PDF preview, Office document preview, Image Preview, 'Select Lists' and 'Popup List of Values' (LOVs). LOVs are produced for foreign key columns and check constraints that define value lists. (Example constraints: col_x references table_y; check (col_x in (1, 2, 3)); check (col_y = 1 or col_y = 3) ).
Boolean fields are detected by analysing constraints, default, datatype, length, nullable, cardinality, contradictions and column name pattern.
Functional fields for row selection, link to single record views, ordering rows in a set, hashed passwords, encrypted passwords, file metadata, audit information.
Logical enclosed references are suppressed in the default display column sets. This is done to avoid the display of redundant information. These hidden columns are automatically initialized in key lookup and DML operations.

Automatic validations
When an input field is changed, validations are performed immediately. Any simple check, size limit, reference, or unique constraint defined in the data dictionary is evaluated. On submit of the form any complex check constraint and required constraint defined in the data dictionary is evaluated.

Navigation links
Produce links to parent, childrens, and sister records.
Report Variants 
  • In 'Form View' reports all normal columns of the selected table are displayed. Serial primary key column and audit columns are hidden by default. In read-only mode, foreign key columns display the labels of the referenced rows. In edit mode, foreign key columns are LOV popup or select list fields with automatically composed labels. When available, additional functional columns can be displayed via the actions/columns menu option. In 'Form View', 'Navigation Counter' and 'Navigation Links' reports the height and width of large text blocks and images is constrained to keep the reports readable. When you click on images or document icon, a document preview modal dialog window is opened. In edit mode you can click on text cells with a pen icon to edit large text fields in an HTML-Editor modal dialog window. Column Limits:View up to 100 columns, Edit up to 60 columns.) 
  • 'Navigation Counter' reports by default only display the natural key columns (labels), counters of references and totals of the active table. For each foreign key that references the current table, a column with count of references to a row is displayed. Depending on the setting of the 'Nested View' option, a click on a counter opens the references in a nested table view or on a separate report page. When available, additional functional columns can be displayed via the Actions/Columns menu option. When a number column of a child table is marked a 'Summand' via the Action/Alter Column Rules Dialog, totals for that columns will be displayed.
  • 'Navigation Links' reports by default only display the natural key columns (labels) and totals for the current table. For each foreign key that references the current table, a column with a list of Links to child rows is displayed. A click on a Link opens the reference in a dialog page. When available, additional functional columns can be displayed via the actions/columns menu option. When a number column of a child table is marked a 'Summand' via the Action/Alter Column Rules Dialog, totals for that columns will be displayed.
  •  'Raw Record' reports by default display all data columns of the selected table. Serial primary key column are hidden by default. Foreign key columns display the internal numeric values as stored in the database. 
  • In 'Import View' reports all normal data columns of the selected table are displayed. Serial primary key column and audit columns are hidden by default. In read-only form, foreign key columns display the labels of the referenced rows, while in edit forms, foreign key columns are LOV popup or select list fields of individual label columns. In case of composite labels each component column is displayed as a separate column. The default report column list is suitable for data export and imports. The data import process can validate a convert CSV data files with columns that match the report columns layout. Then the lookup of foreign key references is automatically performed. Depending on the import setting, new lookup values for foreign keys are inserted in the referenced tables or error messages are produced when that is not permitted. When the natural key values (or chosen display columns values) of the imported data matches with existing rows in the current table, then the data is merged for that rows and the data is inserted in new rows when that keys don't match. 
  • In 'Export View' reports by default all normal data columns of the current and the parent table are displayed by default. The serial primary key column and audit columns are hidden by default. Foreign key columns display the natural keys (labels) of the referenced rows. In the case of composite natural keys (labels) each component column is displayed as a separate column. In the modal dialog for Action/Columns Join Options are displayed. You can set the join options to systematically add columns of the referenced tables for each foreign key reference of the current table. After setting the 'All columns' Join option for a table, you can include further columns of the referenced table recursively up to the root of the keys. Independent of your settings, the report will produce one output row for each row in the current report table.
  • In 'History View' reports old versions of the table data can be displayed. The normal data columns and audit information is displayed by default. For foreign key columns, the composed label values are displayed. When the historic data differs from the current row values, that values are highlighted with different table cell background colors. Row changes have to be recorded in a change log to support the History Views. You have to enable the option 'Enable Change Log Support' in the Settings/Edit History Settings dialog page to enable this recording. 
  • In 'Calendar' views data from the current table is displayed in Calendar regions. The natural keys (labels) are displayed in calendar sheets when a calendar start-date and optional end-date column has been registered for the current table. 
  • In 'Tree View' views data from the current table is displayed in a Tree.The natural keys (labels) are displayed as tree nodes when a parent reference column has been registered for the current table. A parent reference is a foreign key reference to the same table with empty parent references for the root nodes. 
Tabular form 
You can add multiple new rows with default values. At least one empty row will be displayed. Show protected rows as display-only in edit forms. The program supports ordering, text search, pagination


Single record view
The form can be rendered with 1,2 or 3 column layout.


Publish Reports
A connection to the Data Reporter App enables the publication of reports to other users. Application users and whitelisted tables are automatically synchronized into the Data Reporter App. Any report view can be exported as a data source for the Data Reporter App.

Export formats - Form, HTML, CSV, Native
Data can be rendered in 
  • HTML read-only - with formatted data, scroll boxes for large text, and highlighted search matches.
  • HTML input - with input fields for data entry
  • Native - unformatted for Interactive Reports, 
  • CSV - Unicode text files with comma-separated values for downloads.
Export / Import Cycle
  1. Data from the Import Views can be exported in CSV files to the user's desktop. The columns template of the import view specifies a logical column set that contains all data columns and no serial primary or foreign keys and only display key columns of the referenced tables. The columns template can be downloaded and used as a specification for successful data transfer. On the desktop, the users can alter rows, or append new rows with other applications like MS Excel on Mac Numbers and produce a CSV file.
  2. The user can import CSV files into an APEX collection. After the Import of the file, the data will be automatically validated and a first key lookup is performed. The data is loaded into a temporary collection and is displayed in an edit form. Validation messages are shown at grid cells with bad data. The user can manually fix the errors by entering new data. 
  3. After the inspection of the imported file, the user can perform the import by pressing the 'process import' button. The program will perform the processing to update and insert rows in the database.
Import control parameter provides some flexibility to influence the key lookup processing:
    • Compare Case Insensitive: Allow the keys lookup process to match text column values case insensitive.
    • Search keys unique: Require unique constraints for the imported lookup column sets.
    • Insert new foreign keys: Allow the process to insert new rows in lookup tables. When empty key columns are looked up, the program matches rows with empty columns in the lookup table. When other columns but the key columns are imported, then the table schema should be in the third normal form.  There should be no columns that are dependent on other columns but the primary or candidate keys.

Simple data manipulations 
  • Perform validations, lookups, and DML processing for any table. 
  • Sequences related to a table are detected and then used to produce new identities.
  • Change checks are produced to process only relevant rows and to verify that updated rows have not been changed by other users.
  • The processing of the insert, update, or delete operations produces confirmation messages.
    • Success messages inform you about the number of affected rows.
    • Error messages will report any validation or processing error.
    • Validation errors will appear near the corresponding fields in the form.
Advanced data manipulations 
  • Function to duplicate selected rows.
  • In the context of a container reference, there are functions to copy, move, and merge sets of data.
Convenience 
  • The application stores and remembers your settings for the last accessed table, view mode, column layout, and order between sessions. 
  • Sessions can last up to 10 hours before a new login is required.
  • When buttons and menus are invoked by the user, ca. 300 dynamic actions perform the processing and (partial screen updates). This enables fast processing and improved user experience.
  • Field validation is performed when you leave a field.
  • Required-checks are postponed until you submit the form, to avoid needless complaints.
  • Light and Dark Display Themes. 
  • German and English versions of the interface. 
Security 
  • Custom Authorisation - Only registered users can access the Application.
  • all generated links in the application are protected with APEX checksums.
  • Manage User Accounts with access levels, hashed passwords, e-mail validation, request a new password, invite users via e-mail.
  • Control visibility of tables with table name pattern for inclusion, exclusion, admin only.
  • Control write access with table name pattern for edit, read-only.
  • Control (default) visibility of columns with column name pattern for display labels (always), data deduction, hidden, ignored.
  • Deny write access to rows with column name pattern for read-only access.
Developer tools 
  • Query source code: Use a smart switchboard, to display the SQL query that renders the current report. The options are: 
    • Data Source (Table, Memory, Collection)
    • Data Format (Form, HTML, Native, CSV)
    • Data Operations (Select, Insert/Update, Update, Delete, Duplicate, Move, Copy, Merge, Import View Definition, Download Files)
    • Columns Limit, Show at least one row, Compact Queries, Parent Key Visible
    • View and copy the SQL source queries of the current view. 
    • Queries are rendered according to your currently displayed report 
      • relation (master and detail table) 
      • selected columns
      • column ordering and control break
      • the current Report View Mode (Form View, Import View, ...)
      • the chosen Options and Settings for functional columns and other setting rules.
    • View and copy the PL/SQL code for validations, key lookups, and DML processing. Learn, all necessary step to:
      • detect changed rows
      • validate all size limits and imposed constraints and produce human-readable error messages
      • lookup foreign keys for the given situation.
      • perform complicated data manipulations
  • UI Defaults 
Optimize the column descriptions and export them as UI Defaults. UI Defaults will boost productivity when new forms and reports are produced with APEX. A complete set of column attributes is prepared. included attributes are: column label, datatype, input field length, max field length, required/mandatory,  format masks, static default value, static LOV definitions, dynamic LOV definitions, help text (with column comments, format mask, check constraints).
  • Diagrams
    • Entity Relationship Diagrams
    • Database Object Dependencies
    • Dynamic Actions of Apex Pages
The diagrams are rendered using a dynamic springy layout method that is self-optimized and interactive. The user, can zoom, resize, drag and pane to inspect complex relationships and find missing links.
  • DDL tools
    The application derives all attributes of the tables and columns from the schema definitions and the configuration settings of ca. 50 name patterns. For most patterns, common default values exist. The tables that are designed with this application will match the pattern defaults. All data definition statements are written into the app_protocol table.
    • Definition of new tables
      Choose from templates to add functional columns:
      • Parent Tables
      • Referenced tables (Container, Optional Container, Required, Optional)
      • Natural Unique key description 
      • File (Text Editor, HTML-Editor, File, Folder, None)
      • Ordering, Active, Locked, Audit Infos.
    • Add columns
      Define Column Name, datatype, Char length, Default, Required, Unique (Composed, Simple, Non)
    • Alter column comments

    • Alter column rules (constraints)
      Change the setting for Required, Unique, Values List / Range, Default Value / Default Reference.
    • Drop tables.
      Remove table definition and data.
    • Drop Column
      Remove a column from a table.